Feeds:
Posts
Comments

Posts Tagged ‘budget decorating’

Vinyl green thrift chairs

Some of our weekend thrift haul

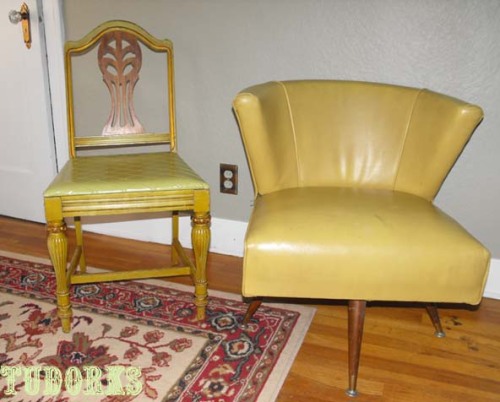
As if we don’t have a million other projects to wrap up, my chair fetish caused me drag in three more chairs this past weekend. I couldn’t pass them up. I love chairs. I love to “fix” them up. Here’s 2 chairs that we bought for under $3 each. I call these the “green tea” chairs because their color reminds me of brewed green tea. I think this shade only happens to old green things covered in tarry cigarette smoke. It’s one of my favorite colors. I really do like the damage that cigarette smoke does to furniture and paintings, haha. It’s like tea staining everything. So, yeah, these chairs are pretty darn grotty.

Does anyone know how to clean old vinyl furniture? These chairs are filthy. In the pic above, I have washed these chairs with Murphy Oil Soap twice. You would not believe how dirty the water has been both times. The pic is doing the chairs some favors. They are much dirtier in real life. Pen ink marks are on the mid-century modern chair. And the chairs are just so dirty. Any suggestions on what to use to clean these? I keep reading that people clean up these mid-century modern vinyl chairs with soap and water. That’s not really cutting it. I need your ancient vinyl cleaning secrets 🙂

I’ll scrub them again today with Murphy Oil Soap solution again and lots of elbow grease. I’m not really fretting because I like these chairs and I don’t go for perfection, I do like some imperfections.  And the price of these chairs were cheaper than 1 large green tea latte. I’m not losing much. I still need to clean up the wood, maybe coat the wood with Howard Wax to disguise visible scratches and add a nice sheen.

-Victoria

Read Full Post »

DIY Picture Frame Shelf

shelf from Country Living

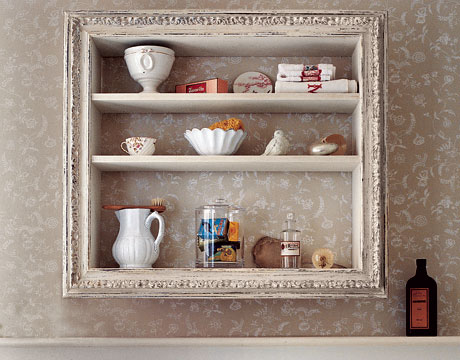
Here’s a really cool DIY shelf from Country Living. Since I found the picture, I’ve found it on many other sites too. I’m trying to find an easy way to incorporate storage in our super small 1930’s bathroom. I like this idea.  I always find fancy picture frames at thrift and antique stores. I don’t buy them because they don’t have glass and because I have to stop hoarding picture frames. (I never use frames). I also can control the depth of the shelf. This is the issue in our small bathroom. Pre-made shelving and storage is too deep. So, now I’m on the hunt for a nice picture frame. Like always, once you are looking for it, you can’t find it. Here’s the tutorial for the shelf on Country Living’s website.

I’ve been super busy trying to finish some of the loose ends around the house. The weather has been oddly cool, rainy, and fall like. This makes me feel like I’m missing out on summer but it makes me keep busy in the house.  Saturday was our 6 year wedding anniversary and our 1 year home ownership anniversary.  So, I’m trying to make up for lost time.

-Victoria

Read Full Post »

DIY Burlap Curtain

Here's my curtain!

I did it! And it was super easy. It really was just as easy as the tutorial on Life To The T made it look. I finished one curtain from start to finish in 20 minutes. I thought this was really good for a person who has never done this before!

I followed the steps on Life To The T. I did not fray the bottom of my curtain. I hemmed the bottom(and all of the sides) with Stitch Witchery. *I have never used that stuff before and it is awesome. It’s the microwave of the sewing world. I felt like I was cheating using it. Well, it is cheating. This stuff was so easy to use I’m thinking about making more curtains, table runners, table cloths, place mats, etc. Somebody take this iron out of my hand!

Close-up of DIY Burlap Curtain

Close-up hem

Burlap has an aroma that I like and I’ve found that the smell has faded in 2 days. Burlap does shed but no worse than the pug like creature living in our house. I seriously couldn’t distinguish the Frink the Frug hairs on my clothes from the burlap hairs.

I did sort of a cafe rod thing with my curtains. I wanted to let some light in while offering some privacy from the neighbor’s window that looks right in. See light is hard to come by here in the Pacific Northwest. I take it while I have it. I wanted the rod to be higher but my handyman  husband wanted to line up to the leaded glass…My curtains aren’t hanging the way I want them to but it doesn’t bother me enough to change it.<bleh>

I’m still debating hanging a curtain on window over the little built-in desk. My original plan was to do it. I wanted the light to be a bit diffused and I wanted something to protect from bleaching UV rays. But, that window faces the back of the house and it isn’t easy to see in. And this window offers a mountain view. I really don’t want to cover it up.(Well, I may cover it up during the “rainy” season.) It was so great in the spring putting on my makeup and only seeing a white sea of plum blossoms and the sun coming over the mountains. Yeah, I live a good life.

pink boudoir window

The "naked" window.

I spent about $11 on this curtain. This price includes all of the materials, hooks, and rod. It was so funny. I was purchasing the burlap for the curtains and I was waiting in line for the material to be cut. The lady in front of me was a sweet Filipina grandma. She asked what the word was for this fabric. She asked me what I was going to do with it. I said,”Make a curtain”. She gave me a look like I was insane. I told her that it’s actually pretty popular and I see it in home magazines all the time. Still got the crazy look. She says, “You know we use this for potatoes and onions in the Philippines.” I was also told it was itchy and should line it in plastic. She spoke with the lady working at the store in Tagalog and I heard a cognate “potato sack curtain” and they laughed. I guess it is a bit odd to have burlap curtains. I’m sure if I told my grandmothers I was spending the evening making burlap curtains that they’d think I was crazy too.

-Victoria

Read Full Post »

For the first time ever, David and I have too much bookshelf in our life. After making a cross country move, we purged and donated lots of books and records. This house has 4 built-in bookshelves in the great room. I don’t know what to do with them because I’ve never had this much space to work with. I’ve collected pictures on-line to inspire me with bookshelves. I’ve figured out what I like about the ones in the magazines but I can’t achieve that in my home.

All the magazine ready bookshelves have these things in common:

-All the books are to the same scale. They are displayed by size. Most of their books are large. It appears that nobody in the magazines have City Lights Pocket Poets Series.

-Never do I see paperbacks! And most of the books appear to be for decoration. For example, they all look antique or old. They are like staged books.

-Cool things are incorporated in the shelves. These cool things, either pictures or knickknacks, all have a common theme. This theme can be white glassware or black & white pictures, you get it. It doesn’t feel so random.

– Sometimes books are grouped by color. I don’t know if I like this.

Tudorks bookshelf

A glimpse at one of our built-in bookshelves.

Here’s my problem:

– My books are all over the place in scale. I have giant hardbacks and teeny tiny City Lights Pocket Poets Series.

– I have paperbacks and books that look new.Many of the books have obnoxious, bright spines.

– I have too many cool things and they are all over the place in theme. I can easily choose a theme but it may take years to get that “look”. I want my theme to be old stuff that I like. Creepy, old stuff, almost like an apothecary. And pictures in black frames. I also want tabletop antique radios on the top of the shelves.

-I may have too much shelf. See this pic above and below. I have 4 of those from floor to almost the ceiling. Because of they are so spacious, they’ve been a catch all for all our random stuff. You see that shelf: antique lighting shades, antlers, 1930’s Guerlain, apothecary jars filled with exotic resins, and pictures of random people with bags of moneys. This has been were we put our stuff to keep it out of the way of the renovation. The bottom ones with the doors have been great storage.

Tudorks Bookshelf

A view of the entire bookshelf, now, add 3 more.

Our great room/living room is a disaster. This room has the most potential but we intimidated by the large space. Also, our furniture doesn’t fit and it will take time to save up to replace it all. Because this room is so useless and ugly, we never go in there. We never use it. I thought the easiest (and cheapest) thing to tackle at this stage would be the bookshelves.

Now what should I do? I’ve been thinking about getting rid of most of the books. I know this doesn’t fly with some people but I would love to go paperless except for antiques. If I can get it on a Kindle, then I should get rid of it. If I want a book, that’s what the library is for. Do I ever go  to that bookshelf and take a book off to read it? No. The only ones that I look at are the antique ones. How do I make my “theme” look intentional during the collection stage? Right now I feel it is all so random, because it is. I don’t want my bookshelves to look like me-maw’s curio cabinet of Swaroski knickknacks and Home Shopping Network collectibles. How can I make these shelves functional? Any ideas?

H.G. Lewis autograph

Had to share our H.G. Lewis autograph

I have to share our Herschell Gordon Lewis autograph. This was one of those too cool things we had boxed away. Who doesn’t want the autograph of the man that started “splatter film” and junk mail. What great contributions to our society!

So, yeah, here’s a peek at one of our many messes. I’m open to suggestions. I feel this is something that I can tackle and maybe this will motivate me to get the great room together. The room isn’t finished. We need a mantel and a sofa that is better scaled for the space. But, the bookshelves just need TLC and editing.

-Victoria

Read Full Post »

House and Home birdy bedroom

I’m aware that it’s popular and it will be cliché one day, but I can’t help it. I love “bird” imagery. I love nature inspired prints and home decor. It would make sense that I would like the whimsy touch of songbirds in decorating. Here are 2 bedrooms that I’ve stumbled upon. The designers of these bedrooms love birds just as much as I do.

This first bedroom was in Canadian House and Home. It’s cute, thanks to the birds and birdcage wallpaper. I love the carefree print. I have really been craving prints lately and that is very unexpected for me. Everything in the room is “cute”. I like the pieces but together I feel they look a bit contrived. Maybe they don’t look so forced “antique” in person. Pictures are difficult like that. All of the neutral colors really let the wallpaper take center stage here. It’s a charming room.

The other room was featured on Room Envy. This room is much more colorful, but it still has the same vibe. Both rooms have beautifully printed wallpaper, white linens, and a lovely iron bed. This is a bit more “lively” version of the first bedroom shown here. I love the accents of teal. Teal is one of those colors that I

bird bedroom featured on Room Envy

have liked for such a long time. I love the mix of prints and the crisp white linens. I love the wallpaper print and would love to have that print on linens or curtains. Adorable.

Bird wallpaper in cute prints is expensive. Often retailing for about $100 a roll, so many to choose from if you type search “bird”, here. I found a nice bird print with lots of teal for $27.99 a roll here. I’ve never dealt with these companies.  I just know, that I like these prints. I’ve also learned that it pays to shop around and to “give in”. Sometimes you must have vague wants such as “blue bird wallpaper” when you’re remodeling on a budget.

Off subject…I made a plum frangipane tart yesterday and it turned out delicious! I’m really taking this cooking thing up a notch. And I purchased a rolling-pin for $5? I’ve complained for 5 years over something that is $5? Why do I not buy the kitchen items that I need? I’ve decided that if I need it then I will buy it. Having a retro kitchen has motivated me to have “retro” kitchen items such as sifters, rolling-pins, pie weights. You know those things that grandma had around but most young moderns couldn’t identify out of a line up?

-Victoria

Read Full Post »

Patchwork Runner Rug

Patchwork Runner from Martha Stewart Living

Here’s an idea that I found on Martha Stewart Living, a patchwork rug. I can not get over how expensive rugs are. I keep saying that I’m going to invest in one that I love because they “transform” a room. After getting Frink the Frug, I refuse to spend $500+ on a rug. Pets are nice but they aren’t nice to rugs. I also can not afford to spend at least $3,000 on rugs for the entire house (our entire home is sans carpet) and have a dog puke on it. So, we’ve been shopping at Ross and I’ve purchased some “it’ll do” acrylic fiber rugs for now. Lowe’s also marks rugs down more than 50% off, watch the clearance sections. We bought a hilarious “Frankenstein” floor sample “runner” Oriental rug for $5. I love the patchwork quirkiness to it, so I started looking up patchwork rugs and found…

This DIY project featured on Martha Stewart Living. I love a patchwork look. It’s quirky, unexpected. Lately, I have really been obsessed with mixing prints. The rugs featured in the pic above are about $5 each. I could easily make a runner for the upstairs foyer for under $40. Plus, I’m starting to see rugs as disposable with all the foot and Frink traffic and I don’t want to spend much. Here is the tutorial on how to make a patchwork runner. I’m positive I can do this. Heck, I may keep going and make a large rug.

I think I’ll go out today and price check some small rugs like this. Didn’t I say I was going to paint a floor canvas for the dining nook this summer? Yes, I did. Need to order that. This renovation mess is finally starting to look like a home!

Today I’m attempting to bake a fresh plum frangipane tart for the first time. I hope it turns out nicely. I have to run out and buy a rolling-pin. For 5 years I’ve said I need a rolling-pin. Today, I am being proactive and buying one.

-Victoria

Read Full Post »

“Ooops” paint. Recycled paint. Mistints. We have painted over 75% of the house, 2500 square feet, in mistints. Mistints are wonderful. They are paint that is at least a 50% reduction in price. If you look enough, you will find what you need in the finish that need. That being said. It’s became a little bit of an obsession. We frequently visited all the home improvement stores in town at least bi-weekly during our painting phase. I have used mistints to paint the kitchen and studio a perfect 50’s aqua, the great room a deep gray, the dining nook a cool gray, a strange mushroomy shade for the bedroom and media room, a girly pink for the boudoir, and a boring buttery taupe for the foyers. Along the way, I have collected lots of putties, whites, and pale blues to paint furniture in. This is our Wonderful Wall of Mistints, you should see the Wonderful World of 5 Gallons in the garage.

Mistints are awesome because:

They are cheap. They are 50%-75% cheaper than retail.A gallon ranges from $5 to $10, 5 gallons from $25-$50, and the smaller sizes from $1-$2.50. Usually all brands are priced the same. This means that you could get the high-end or designer paint for $5, even the specialty metallic finishes.

They are resourceful. Mistints are really “green”. Where do you think this stuff goes if it isn’t sold? Into our landfills. Why create more waste when you have new paint already mixed? Most paint is no or low VOC these days, but this doesn’t mean that they will be environmentally friendly if we put them in landfills! This is why some trendy people like to call mistints “recycled” paints.

They are exciting. OK, this is a stretch. But, it is so much fun to find what you were looking for. It is a bit of rush. If you are thrifter then you know what I’m talking about.

They aren’t just for walls. Artists and crafters, house paint is acrylic paint. You can get a gallon of paint for $5! You can mix colors and put them in smaller bottles. Buy mistints for your art. Buy mistints to paint your flea market furniture and picture frames. You can also find stains with the “ooops” paints.

I find that our culture has a strange relationship with color. Many Americans can’t see the difference between a cool tone red or a warm tone red, but they get so picky when it comes to paint. They fret and worry about paint. It’s nuts. When I worked in the makeup biz, I learned about this strange obsession. They believed, like a prince in shining armor that offered true love, that there was only one shade that would work with their skin. Any makeup artist will tell you that it is like a Bell curve, making a minimal of 6 shades that will work under any lighting or circumstance. Paints are the same. Anyways, wasn’t I talking about home stuff and paint?  I find new mistints every time I go to the store. Many times I think the colors are wickedly ugly such as  LED light blues. Nasty.  Those mistints prove that the person getting them mixed was tasteless. But, tasteless or not, they left them. They were smacked out of their color delusion. Most of the time I find decent shades. I think these are the freaky people. The people that geek because the color doesn’t match the zig-zag stripe in their living room curtains. These are the matchy-matchy people. I am not one of these people. They terrify me.I’m the bird of prey that swoops in, picking up on their mistints and profiting from their type A personalty. I see colors in a spectrum and like cosmetic colors, colors used in decorating have some “bend” to them. There is not just one “perfect” color, but a “perfect” family of colors. But, this being said, I don’t see things as matchy-matchy and I don’t go to big ass “art” sales at the hotel to purchase “couch-sized hand-painted oil paintings”. I don’t take the Rooms to Go approach to decorating. It’s just not me.

Tips for Buying Mistints:

Start searching early. Check for mistints months before you actually start painting. This gives you more time to get what you want.

Shop for mistints in the spring-summer. I have found, at least in our area, that more mistints show up in these seasons because more people are doing home renovation projects and are most likely moving in the summer.

Have guidelines. For example, if you did not want a glossy finish and you found a perfect robin’s egg blue in a gloss but you wanted flat. Don’t buy it. You won’t be happy. Also, have some idea of what color you are looking for either be “blues” or “sorbet pales”. It makes life easier and if you have an idea of what you want, you’ll be happier. Plus, you need to buy the right paint for you space. No flats in the bathroom.

Be flexible. Have guidelines that keep you from bringing home any ole’ tub of paint, but be flexible. For example, there isn’t that big of difference between a satin or an egg-shell. Most people won’t notice that your mint is cooler than the what you had wanted. In the end when you have all of your furniture and decor in, your space will look great. Any new color or a fresh coat of paint makes a space look polished, even if it is mintier than the mint you wanted 🙂

Mix it and stir it! I have found that mistints are usually the “tricky” colors. They look like one color when they are wet and completely change when they dry. Mix them thoroughly to get the pigments evenly distributed. Be a little compulsive about it, stirring during the painting process or before you pour new paint into your tray. (Really you should do this with all paint).

Keep a color sample of the paint. If for some reason you miscalculated and need more paint, they can mix it. Keep a color sample or the can. Cans usually have bar codes on them that hold the “secrets” of the mixture.

More advice and learning by renovating: Exterior paints in the interior won’t make the place self destruct, but it takes a long time to dry. We used an exterior in the interior in the great room. It went on fine and even; it was better than most of the interior formulas. We didn’t hang pictures for about a week. Paint is paint and you can’t tell the difference. People go, “Oh, you’ll have to prime that when you want to change colors”. Yeah, I will. From my experience you have to prime everything, especially a dark liver gray on lath and plaster walls. Today’s paints require and expect that you’ll prime.

-Victoria

Read Full Post »
"Fancy" 5 cent pulls (only 2 of those)

OK, so it took me some time to find the kitchen drawer and cabinet hardware that I wanted, but I did find it. I wanted something chrome-like and 50’s dinner or 30’s streamline moderne. In the basement, there were some built-ins with the coolest pulls. I wanted something like that. The items offered at Lowe’s were either Scandinavian modern or country kitchen. Not what I wanted. Here’s what I wanted and how I got it:

Our kitchen. Don't judge me on the mess. No dishwasher 😦

Hickory Hardware "The American Diner" knob, reproduction

For the cabinets we purchased from Van Dyke’s Restorers “The American Diner Knob” in Chrome. We paid less than $2.50 for each. I don’t know if Van Dyke’s is carrying the chrome knob anymore. We of course ordered many of them and needed one more. Van Dyke’s was sold out. We found our last one on Amazon for more money. The American diner knob is manufactured by Hickory Hardware. So if you are looking for this style of knob, search for places that sell Hickory Hardware. Total cost for us: $21.50 plus shipping (including Amazon knob). I think shipping was like $9 (ordered some other things). And I had to buy that lonesome knob from Amazon for like $4.50.

OK, now to the drawers. I wanted something that matched the built-ins in the basement. We looked and looked. We were about to order The Deco Drawer Pull from Rejuvenation in Polished Chrome. This beautiful pull retails for $16 each. Ouch, we’d have to buy 13 of them. But, I was sick of looking and I wanted to open and use my drawers. By chance that afternoon I went to our local Habitat for Humanity thrift store. I found the pulls picture here for 5¢ each! OK, so they aren’t as jazzy as the Deco Drawer Pull. But, they are so cheap, in awesome condition, and are original. I picked up more than I needed (in case I didn’t notice rust or needed to replace a few). I even got a set that was very fancy. I used these on the cabinets under the sink. It pays to thrift! Now looking at all of them up. I think I like these better than The Deco Drawer Pull because they are simple. The kitchen has

5 cents kitchen "plain" retro pulls

more of a pink/aqua 50’s vibe and the ones that we have “fit” better. Total cost for us: 65¢

We were fortunate enough to have these hinges already on the bottom cabinets. They cleaned up nicely. They aren’t perfect but I’m not going for perfect. I’m also going for cheap. Total cost to us: $0

Our total on kitchen hardware: under $30 (including shipping) for 20 drawers and doors. We didn’t have to buy screws for the vintage hardware. We already had that lying around.

Guide to Retro Hardware:

Looking for retro hardware or retro looking hardware? Look at dealers such as Van Dyke’s Restorers. Do not overlook their clearance page. It has awesome deals! Who knows? Maybe what you want is on sale or you can settle for something similar. If you know you like a reproduction knob/pull. Find out who the manufacturer is and search for them on-line. Find the best deal that way. Love the ease of Internet shopping! If you’re not on a budget search at places like Rejuvenation or Anthropologie.Don’t forget about salvage yards, thrift stores, and even antique stores. Sometimes you can find a great deal like we did. By thrifting we saved over $205! If you choose to go the thrift route be prepared to look and look. Keep a list of the number of knobs/pulls that you need and their dimensions on your phone or in your wallet. And if your going cheap, don’t forget to mix and match. It can look really great and polished. Check out kitchens in design magazines. They usually use up to 5 different knob/pull designs in a large kitchen. I need to add that sometimes salvage yards will make “trades”. Have a 40’s sink you switched out for something else? Trade it for hardware. (I’d call before hauling a sink around). Also check out vendors on Etsy. Etsy has options that fit into the no budget range and the budget range. It’s worth checking out.

*I’m not the best at pictures. Excuse my crummy quality. Photographing small chrome things is not easy. Also, this is a living and working kitchen. Excuse my crummy mess. I don’t have the mad skills to Photoshop the dirty dishes out 🙂

Original hinges

-Victoria

Read Full Post »

Our great room lighting

I am aware that I complain about lighting frequently. I rarely find things that I like and if I do, it is expensive. I do feel that lighting is a nice investment since it adds so much character to your home. It may not make you money in the long run since it is such a taste game but it really does tie your look together. I can’t afford to purchase all of my dream lighting at once. Or maybe ever… The great room was difficult for us. We want a formal room, something creepy and stuffy. We also wanted to purchase antique period lighting but I couldn’t’ find anything to suit the home. The lighting was either too large for our 30’s suburban home or just too craftsman. Nothing seemed to fit our home’s personality. And I’m not paying $800+ for something that isn’t perfect. The room’s lighting was replaced by the previous owner with the ugliest and cheapest “spot” lighting ever. We had to get rid of it, quick. It was disgusting and only one light bulb worked. I wanted something nautical or octopus like, I can’t afford a Walacavage at this time. While rummaging through our Habitat for Humanity’s building salvage yard, I found this lighting. At 1st, hubby wasn’t having it. He thought it appeared too “normal” and “McMansion” or trying too freak’n hard to be affluent. I told him he had to trust me. And if he didn’t like it, we were only going to lose $8. I purchased globe vanity bulbs to make it look less traditional and to make it look more 60’s and octopus-ish. David put it up and really liked it. It goes well with our dark, cave-like room. And with bulbs and all, it was under $18.

-Victoria

Read Full Post »

I have such a jewelry storage issue. I have many cute things that I often forget about. My jewelry storage solution that I have had for the past 5 years is a cardboard liquor box with different plastic baggies filled with vintage brooches, Etsy finds, and silly costume jewelry. This is a mess. I never wear any of it and I don’t even know what I have. I’ve been on a jewelry storage expedition. Since my life is a bit more permanent now that I’m not renting, I feel it is time to unpack the accessories. I’ve looked at jewelry armoires. They seem to be very practical with spaces for everything. However, I don’t wear earrings and the craftsmanship of such armoires seem to vary. I’ve missed all of Target’s mega jewelry armoire blow-outs after Christmas. Argh! I could of got a decent one for $30! Oh, well. I also want something cuter than the generic mass retailer jewelry storage solution. I would love to have an old piece of storage furniture from a pharmacy or something. That will take some time to find and it is costly. I really like this jewelry medicine cabinet that I found on marthastewart.com. This idea doesn’t hold too much but it would be nice for necklaces and brooches and hat pins. I always find cute 30s era medicine cabinets at our local Habitat for Humanity salvage outlet. I always want to pick them up but I can’t think of anything to do with them. Now I can. I could line it with a luxurious fabric and use adorable fleur de lys pin hooks to hold necklaces. I also come across metal cabinets. All I would need for those are magnetic hooks. This would also be a cute storage option for delicate fragrance oils. I would say that I could easily do this project for under $30 sans my valuable time.

-Victoria

Oh, and Happy Nowruz! We’ve had a great sunny, Saturday!

Read Full Post »

Older Posts »