Feeds:
Posts
Comments

Archive for the ‘DIY’ Category

Mess striped painted walls

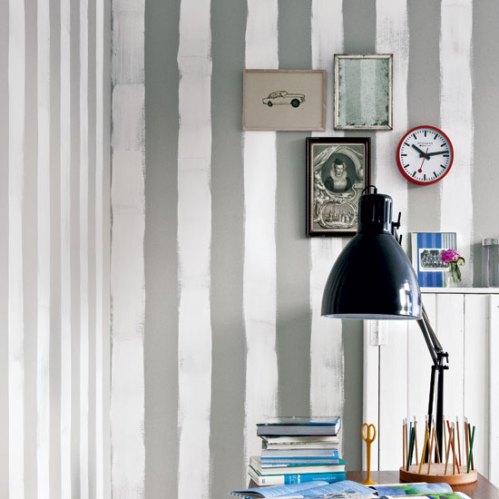
"Messy" stripes from Living Etc.

You guys know I really like painted or wallpaper striped walls. It’s a reoccurring them here on the Tudorks blog. I like stripes. They’re visually striking. I came across this gray and white room on Living Etc. I love the gray and white stripes, this is a nice neutral color combo. This office or studio is a bit masculine they way that it is decorated here, but you could pair this with a robin’s egg blue or pink to make it more feminine.

Yeah, gray and white = nice color combo. But, that isn’t what I really love about this little room. It’s the stripes. Love the messy, freehand stripes. This would be so easy to do. I can tell that the white was added over the battleship gray. Stripes don’t have to be perfect. And if you are a DIYer like us, then you probably won’t get perfect even if you tried. So this is “intentional” messiness. All you need to do is to get your spacing right, don’t worry about a crisp edge. I also like it in this Living Etc. room because it seems to be an office or a studio. We see art supplies and these stripes are creative, resembling an artist’s brush strokes.

So, what do you think? Do you think this would look silly and like a 5-year-old did it, if you saw it in person? Or do you think this adds a cute quirkiness to a room? I think it is a nice take on stripes. I won’t be doing it because stripes in general don’t fit with our home.

Today I’m fine cleaning the bathroom. My nostril hairs are singed from bleach. I’m hoping to finish this bathroom someday! And then we have a powder room to complete…I’ve also had a stupid day filled with spiders and smashing my thumb in a 1930’s solid wood door, the same door that broke my toes this time last  year.

-Victoria
Read Full Post »

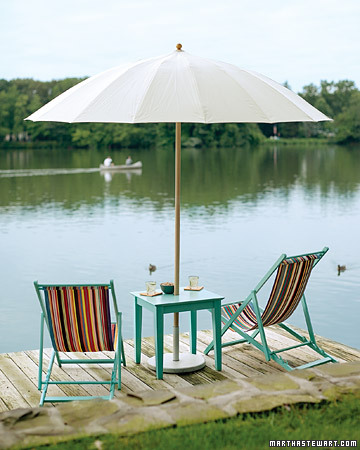
Martha Stewart Lving lakeside photo

from Martha Stewart Living

This is one of those “duh” ideas, but I have to admit that it didn’t cross my mind until I saw it on Martha Stewart Living. I am really enjoying having a deck. We have a small table with a small umbrella that we use for dining. We usually eat outdoors in the evening when there is no need for the umbrella. If we are out during the day, we are usually relaxing with a glass of tea. No shade. This is a bummer, especially with a hot weekend coming up. I want to be out enjoying it before the rainy season. I think if I did something like this, the umbrella would get much more use. It’s an easy project. I can find a small wood table at a thrift store or yard sale. I’ll slap some of my exterior mistint paint on it. I

Here’s the tutorial.

I’ve been very busy this week wrapping up some loose ends while I still have the time. I’m still working on before and after pictures. This helps me see how much work we’ve actually done. It’s easy to get obsessed with the “what’s left to do” stuff and ignore everything that you did. It’s supposed to be near 90° this weekend. I doubt anything will be getting finished on this house. Time to hit the coast!

-Victoria

Read Full Post »

DIY Picture Frame Shelf

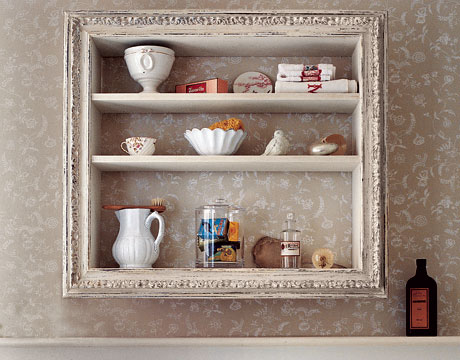
shelf from Country Living

Here’s a really cool DIY shelf from Country Living. Since I found the picture, I’ve found it on many other sites too. I’m trying to find an easy way to incorporate storage in our super small 1930’s bathroom. I like this idea.  I always find fancy picture frames at thrift and antique stores. I don’t buy them because they don’t have glass and because I have to stop hoarding picture frames. (I never use frames). I also can control the depth of the shelf. This is the issue in our small bathroom. Pre-made shelving and storage is too deep. So, now I’m on the hunt for a nice picture frame. Like always, once you are looking for it, you can’t find it. Here’s the tutorial for the shelf on Country Living’s website.

I’ve been super busy trying to finish some of the loose ends around the house. The weather has been oddly cool, rainy, and fall like. This makes me feel like I’m missing out on summer but it makes me keep busy in the house.  Saturday was our 6 year wedding anniversary and our 1 year home ownership anniversary.  So, I’m trying to make up for lost time.

-Victoria

Read Full Post »

DIY Burlap Curtain

Here's my curtain!

I did it! And it was super easy. It really was just as easy as the tutorial on Life To The T made it look. I finished one curtain from start to finish in 20 minutes. I thought this was really good for a person who has never done this before!

I followed the steps on Life To The T. I did not fray the bottom of my curtain. I hemmed the bottom(and all of the sides) with Stitch Witchery. *I have never used that stuff before and it is awesome. It’s the microwave of the sewing world. I felt like I was cheating using it. Well, it is cheating. This stuff was so easy to use I’m thinking about making more curtains, table runners, table cloths, place mats, etc. Somebody take this iron out of my hand!

Close-up of DIY Burlap Curtain

Close-up hem

Burlap has an aroma that I like and I’ve found that the smell has faded in 2 days. Burlap does shed but no worse than the pug like creature living in our house. I seriously couldn’t distinguish the Frink the Frug hairs on my clothes from the burlap hairs.

I did sort of a cafe rod thing with my curtains. I wanted to let some light in while offering some privacy from the neighbor’s window that looks right in. See light is hard to come by here in the Pacific Northwest. I take it while I have it. I wanted the rod to be higher but my handyman  husband wanted to line up to the leaded glass…My curtains aren’t hanging the way I want them to but it doesn’t bother me enough to change it.<bleh>

I’m still debating hanging a curtain on window over the little built-in desk. My original plan was to do it. I wanted the light to be a bit diffused and I wanted something to protect from bleaching UV rays. But, that window faces the back of the house and it isn’t easy to see in. And this window offers a mountain view. I really don’t want to cover it up.(Well, I may cover it up during the “rainy” season.) It was so great in the spring putting on my makeup and only seeing a white sea of plum blossoms and the sun coming over the mountains. Yeah, I live a good life.

pink boudoir window

The "naked" window.

I spent about $11 on this curtain. This price includes all of the materials, hooks, and rod. It was so funny. I was purchasing the burlap for the curtains and I was waiting in line for the material to be cut. The lady in front of me was a sweet Filipina grandma. She asked what the word was for this fabric. She asked me what I was going to do with it. I said,”Make a curtain”. She gave me a look like I was insane. I told her that it’s actually pretty popular and I see it in home magazines all the time. Still got the crazy look. She says, “You know we use this for potatoes and onions in the Philippines.” I was also told it was itchy and should line it in plastic. She spoke with the lady working at the store in Tagalog and I heard a cognate “potato sack curtain” and they laughed. I guess it is a bit odd to have burlap curtains. I’m sure if I told my grandmothers I was spending the evening making burlap curtains that they’d think I was crazy too.

-Victoria

Read Full Post »

I’ve been wanting something rustic to off-set my super cute pink boudoir. I like pink but there is more to pink than “pretty, pretty princess”. I’ve been meaning to purchase burlap or raw linen curtains for the 2 windows in the super tiny room for months now. There is nothing I hate more than paying money for curtains. Window furnishing are killing my home budget.I can’t think of anything less fun to spend my dough on.

I am so happy to find this DIY burlap curtain tutorial on Life to the “T”. Not only does it look adorable and much more expensive than the small amount of money put in to it, but there’s no sewing! This is great for someone like me who doesn’t have a sewing machine. I’ve seen these burlap curtains for $50 a panel too. If you make your own no-sew, I’d say you have about $5 in each one. I have about $3 in mine plus my sweet time.

Here's the final curtain from Life to The T. Cute, huh?

Go check out the tutorial on the blog, Life to the T. Mrs. T makes this look so easy because it is. Guess what? I “made” a curtain in less than 20 minutes. I’ll definitely share pics with you tomorrow. It is exactly what I wanted. Right now I’m in the “finger wave” stage. I’m creating waves with clothespins. It is seriously like setting a Marcel waves but with fabric. I also have to say that I love Mrs. T’s room, great use of color and accessories. And great mix of prints!  I have the exact same curtain rods in our great room. And boy do they look snazzy against that acidic green paint! Makes me want to paint my walls this color again…

Tomorrow I’ll post my burlap curtains and give you a tour of my “boudoir”.

-Victoria

*Check out the blog, Life to the T, for more fun DIY home tutorials such as an old window used as a “hanger” for papers or towels.

Read Full Post »

The Brick House Pipe Shelving

Photo from The Brick House

I love an industrial look. You see many of my posts featuring that antique warehouse “raw” feel. So I was delighted when I cam across 2 tutorials for pipe shelving. One is on The Brick House. This shelving unit totally transformed the space. I would love to put one of these up in the studio. The other isn’t as much of a tutorial, but it features lots of nice motivating pictures. It’s on Apartment Therapy.

It looks like making your own pipe shelving isn’t so difficult according to these two DIY posts. For under $200 you can really change a space and add a bit of an open and industrial feel.

I also like the thought of using a pipe shelving unit like this as a shelving unit room divider. It could be mounted from floor to ceiling.

I do worry a little about installing one of these on our lath and plaster walls. I’m sure that installing any shelving to our walls will mess it up. It’s one of those situations. I hope that you’ll see a tutorial of our version of pipe shelving in the future…

-Victoria

Read Full Post »

Cleaning antique hardware

One of 8 sets of door hardware I cleaned. About 80 years old.

Restoring the hardware in your home is typically not difficult, and not something so time-consuming or expensive that you shouldn’t learn how to do it for yourself.  Now that our renovation is mostly complete, I look back at our hardware restoration dollars spent as having the highest return on investment of any task we took on.  The value of the hardware in our home makes me want to part out my house and Ebay it like an old car.  I stripped multiple coats of paint off of all of the copper, brass, and chrome hardware in the house and most of it came out perfect.

Warnings:

1.  The actual condition of your hardware is unknown.  There might be a good reason it was painted.

2.  Plated metals are really hard to work with.  Chrome plating much older than 40 years is almost definitely toast.  Don’t expect much good to come out of these procedures if used on chrome hardware.  There is still hope for your chrome hardware, but that’s a different procedure than this article will address.

3.  Some of the chemicals used here are corrosive and produce toxic fumes.  Wear goggles, chemical resistant gloves old clothes, and a canvas or rubber apron.

4.  Let the chemicals do the work! Don’t go grinding and scratching furiously on your hardware or you’ll destroy it.  Then you’ll end up with hardware that will look a lot like it could have been very nice.

Your shopping list:

1.  Chemical Resistant Gloves: I got mine at Wal-Mart in the “janitorial” section.  They’re cheap, if you have much to do, buy two pairs.

2.  Goggles: get the full coverage style you remember from science class.  Probably overkill, but blind is forever.

3. Canvas Apron: a good cheap way to put another layer of protection between your skin and the stripper.

4. Paintbrush: gel stripper works best if painted on with a brush.  Buy a new one so you can be sure it’s clean.  Tag this brush so you don’t accidentally ruin a bucket of paint with it.

5.  Klean-Strip KS-3: a good gel-based stripper. Gel is safer because it clings to surfaces and is less likely to splatter.  I read a lot of people recommending citrus based stripper products for environmental reasons, but I haven’t tried it.

6.  WD-40:  You probably have some around already.

7.# 0000 Steel Wool: Don’t step up in grit and think that your work will get done faster. This is for polishing and cleaning, not sanding/abrading.

8.  Wire Brush: Get one that’s just soft enough to brush against your skin. More bristles will move more gunk and scratch less.

9.  Fine tools: toothbrush, razor blade for getting into tiny spaces where the stripper has a hard time penetrating.

10. White T-shirt Rags: just go ahead and buy a box of jersey rags because you’ll burn through tons of them.  The white color is so you can clearly tell what is getting removed, and so that no dyes or screen printing dissolves while you’re working.

11.  Metal or Glass Tray or Pan and a Soupcan: thrift store cookware will be fine here, or grab a cheap metal paint roller tray.

This is all commonly available, and all adds up to a little under $100.  I told you this was cheap! (more…)

Read Full Post »

Patchwork Runner Rug

Patchwork Runner from Martha Stewart Living

Here’s an idea that I found on Martha Stewart Living, a patchwork rug. I can not get over how expensive rugs are. I keep saying that I’m going to invest in one that I love because they “transform” a room. After getting Frink the Frug, I refuse to spend $500+ on a rug. Pets are nice but they aren’t nice to rugs. I also can not afford to spend at least $3,000 on rugs for the entire house (our entire home is sans carpet) and have a dog puke on it. So, we’ve been shopping at Ross and I’ve purchased some “it’ll do” acrylic fiber rugs for now. Lowe’s also marks rugs down more than 50% off, watch the clearance sections. We bought a hilarious “Frankenstein” floor sample “runner” Oriental rug for $5. I love the patchwork quirkiness to it, so I started looking up patchwork rugs and found…

This DIY project featured on Martha Stewart Living. I love a patchwork look. It’s quirky, unexpected. Lately, I have really been obsessed with mixing prints. The rugs featured in the pic above are about $5 each. I could easily make a runner for the upstairs foyer for under $40. Plus, I’m starting to see rugs as disposable with all the foot and Frink traffic and I don’t want to spend much. Here is the tutorial on how to make a patchwork runner. I’m positive I can do this. Heck, I may keep going and make a large rug.

I think I’ll go out today and price check some small rugs like this. Didn’t I say I was going to paint a floor canvas for the dining nook this summer? Yes, I did. Need to order that. This renovation mess is finally starting to look like a home!

Today I’m attempting to bake a fresh plum frangipane tart for the first time. I hope it turns out nicely. I have to run out and buy a rolling-pin. For 5 years I’ve said I need a rolling-pin. Today, I am being proactive and buying one.

-Victoria

Read Full Post »