Feeds:
Posts
Comments

Posts Tagged ‘antique’

Vinyl green thrift chairs

Some of our weekend thrift haul

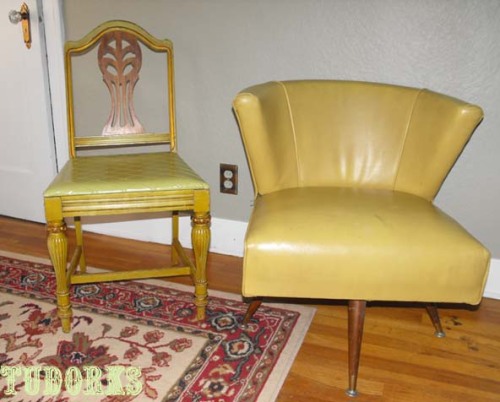
As if we don’t have a million other projects to wrap up, my chair fetish caused me drag in three more chairs this past weekend. I couldn’t pass them up. I love chairs. I love to “fix” them up. Here’s 2 chairs that we bought for under $3 each. I call these the “green tea” chairs because their color reminds me of brewed green tea. I think this shade only happens to old green things covered in tarry cigarette smoke. It’s one of my favorite colors. I really do like the damage that cigarette smoke does to furniture and paintings, haha. It’s like tea staining everything. So, yeah, these chairs are pretty darn grotty.

Does anyone know how to clean old vinyl furniture? These chairs are filthy. In the pic above, I have washed these chairs with Murphy Oil Soap twice. You would not believe how dirty the water has been both times. The pic is doing the chairs some favors. They are much dirtier in real life. Pen ink marks are on the mid-century modern chair. And the chairs are just so dirty. Any suggestions on what to use to clean these? I keep reading that people clean up these mid-century modern vinyl chairs with soap and water. That’s not really cutting it. I need your ancient vinyl cleaning secrets 🙂

I’ll scrub them again today with Murphy Oil Soap solution again and lots of elbow grease. I’m not really fretting because I like these chairs and I don’t go for perfection, I do like some imperfections.  And the price of these chairs were cheaper than 1 large green tea latte. I’m not losing much. I still need to clean up the wood, maybe coat the wood with Howard Wax to disguise visible scratches and add a nice sheen.

-Victoria

Read Full Post »

House and Home white bedroom

Canadian House and Home white bedroom

I love both of the bedrooms here because I like their simplicity. Both rooms have dark metal/iron beds. Both of these rooms remind me of the Tudorks bedroom: dark metal bed, antique luggage, fancy lighting. What do I want after seeing these rooms? White bedding.

This first crisp white bedroom was featured in Canadian House and Home. This is one of those rooms that would be pretty even when standing empty. The ceiling has interesting lines and the floors are stunning. If we were to refinish our hardwoods, this is the stain that I would use. There really isn’t a more classy look that light walls and dark hardwoods. This room has nice accents. I love metal beds and old suitcases and luggage used as storage. This is a winning combination. What would I have done differently in this room? Well, I wouldn’t of painted the window trim a darker shade of white for a needed contrast. People underestimate the power of that little trick when they have bright white walls.

The other bedroom is beautiful as well. I do not recall where this room was first featured. I apologize. It reminds me of the first room because it is white, neutral and the dark metal bed adds needed contrast. This second white bedroom is much more rustic. It looks less new than the House and Home room. This white bedroom has a very old home shape. It looks like the bedrooms in our home. It really looks like a smaller version of our studio.This room also has a dark metal bed and dark pictures for high contrast against the white walls. This room’s floors are the opposite, painted white. It’s such a beautiful look. This room has such a fresh feel but it is grounded by rough antiques. This grit gives this white bedroom character. And note to self: We have walls like the ones in this room and I haven’t put pictures up. I love the row of low paintings. I need to do this. Great excuse to hang

Rustic white bedroom

Rustic white bedroom

up my Audubon  bird pictures.
I really do love both of these rooms. They are my “style”.

I’ve been going through the house taking so many pictures lately. Next week will be the 1 year anniversary of our home ownership and our home restoration. We’ve done so much but it’s easy to think you haven’t when some things are still a wreck. I’m happy we have pictures to remind us of all our hard work. I’m trying to get before and after pictures ready to share. You’ll get some giggles out of the “befores”. Who else do you know moved in a house with a 13 foot mural/silhouette of  a naked lady? Who else do you know had to peel faux fur off of every door in their house? Who else do you know was peeling adhesive off of the ceiling where mirrors used to be? Geez…

-Victoria

Read Full Post »

The Brick House Pipe Shelving

Photo from The Brick House

I love an industrial look. You see many of my posts featuring that antique warehouse “raw” feel. So I was delighted when I cam across 2 tutorials for pipe shelving. One is on The Brick House. This shelving unit totally transformed the space. I would love to put one of these up in the studio. The other isn’t as much of a tutorial, but it features lots of nice motivating pictures. It’s on Apartment Therapy.

It looks like making your own pipe shelving isn’t so difficult according to these two DIY posts. For under $200 you can really change a space and add a bit of an open and industrial feel.

I also like the thought of using a pipe shelving unit like this as a shelving unit room divider. It could be mounted from floor to ceiling.

I do worry a little about installing one of these on our lath and plaster walls. I’m sure that installing any shelving to our walls will mess it up. It’s one of those situations. I hope that you’ll see a tutorial of our version of pipe shelving in the future…

-Victoria

Read Full Post »

David and I are trying to take control of our space. We have rooms that we never spend time in. I think we are used to living in a smaller space. Those “other” rooms aren’t really useful. We spend most of our time doing “desk” things from writing, blogging, and inking. I’m thinking of establishing “mini-offices” throughout the house. A mini-office for inking, his and hers laptop mini-office etc. Here are 2 quaint studies that I like. These have an industrial warehouse type of “raw” vibe.

Anthropologie "study"

The first one is a open loft room that I found Anthropologie. This space is nothing like my home. It’s big and open with exposed bricks. Terrible overhead lighting. But I love the look. It’s raw and rough and if I had an urban loft, this is what I would want it to look like. This “study” is obviously not a study, except for a study of the Edison style lighting sold at Anthropologie. But, like I said before I like the feel of this. I’m thinking we could have a little desk like this with an aluminum stool in the studio or something. We could do computer stuff, something like that. I really just want a place to put my industrial lighting and apothecary jars of old knob & tube wiring we have from the house. Why am I such a sucker for industrial rustic look?

This other room or “study” is from Rejuvenation. It’s a bit more functional of a space and it resembles my home more than the Anthropologie loft. The Rejuvenation space has exposed bricks as well, but better lighting (expected from a lighting retailer). This space has the same industrial, antiquarian vibe as the Anthropologie loft. Both of these spaces could be used a study nook or a Tesla-like mad scientist workshop nook. A little off subject, but I love the brass lighting featured here. I didn’t know that I liked pendant styled lighting so much.I knew I loved brass.

Rejuvenation study

I obviously do not have a turn of the century loft to call home. But, I feel I can get this same feel and vibe in my house. I also like the idea of shoving a mini-office in any room. It makes me feel like I’m creating more versatility in my living space. However, I fear that if I put a desk in more than one place that it will get loaded with unsightly papers, bills, etc. They’ll never look as industrial chic as these 😦

-Victoria

Read Full Post »

Cleaning antique hardware

One of 8 sets of door hardware I cleaned. About 80 years old.

Restoring the hardware in your home is typically not difficult, and not something so time-consuming or expensive that you shouldn’t learn how to do it for yourself.  Now that our renovation is mostly complete, I look back at our hardware restoration dollars spent as having the highest return on investment of any task we took on.  The value of the hardware in our home makes me want to part out my house and Ebay it like an old car.  I stripped multiple coats of paint off of all of the copper, brass, and chrome hardware in the house and most of it came out perfect.

Warnings:

1.  The actual condition of your hardware is unknown.  There might be a good reason it was painted.

2.  Plated metals are really hard to work with.  Chrome plating much older than 40 years is almost definitely toast.  Don’t expect much good to come out of these procedures if used on chrome hardware.  There is still hope for your chrome hardware, but that’s a different procedure than this article will address.

3.  Some of the chemicals used here are corrosive and produce toxic fumes.  Wear goggles, chemical resistant gloves old clothes, and a canvas or rubber apron.

4.  Let the chemicals do the work! Don’t go grinding and scratching furiously on your hardware or you’ll destroy it.  Then you’ll end up with hardware that will look a lot like it could have been very nice.

Your shopping list:

1.  Chemical Resistant Gloves: I got mine at Wal-Mart in the “janitorial” section.  They’re cheap, if you have much to do, buy two pairs.

2.  Goggles: get the full coverage style you remember from science class.  Probably overkill, but blind is forever.

3. Canvas Apron: a good cheap way to put another layer of protection between your skin and the stripper.

4. Paintbrush: gel stripper works best if painted on with a brush.  Buy a new one so you can be sure it’s clean.  Tag this brush so you don’t accidentally ruin a bucket of paint with it.

5.  Klean-Strip KS-3: a good gel-based stripper. Gel is safer because it clings to surfaces and is less likely to splatter.  I read a lot of people recommending citrus based stripper products for environmental reasons, but I haven’t tried it.

6.  WD-40:  You probably have some around already.

7.# 0000 Steel Wool: Don’t step up in grit and think that your work will get done faster. This is for polishing and cleaning, not sanding/abrading.

8.  Wire Brush: Get one that’s just soft enough to brush against your skin. More bristles will move more gunk and scratch less.

9.  Fine tools: toothbrush, razor blade for getting into tiny spaces where the stripper has a hard time penetrating.

10. White T-shirt Rags: just go ahead and buy a box of jersey rags because you’ll burn through tons of them.  The white color is so you can clearly tell what is getting removed, and so that no dyes or screen printing dissolves while you’re working.

11.  Metal or Glass Tray or Pan and a Soupcan: thrift store cookware will be fine here, or grab a cheap metal paint roller tray.

This is all commonly available, and all adds up to a little under $100.  I told you this was cheap! (more…)

Read Full Post »

We really underused white during our renovation. Now that I am design exhausted, I feel that white would of been the way to go. It’s simple and fitting, especially for bathrooms. The only two “big” projects that we have left are the bathrooms. One have one full-size bath (as full-size as a 1930’s bathroom comes) and a “powder” room. I’m halfway finished with the full bath. I can’t decide what to do with the powder room. We keep changing our minds.

This first bathroom is very nice, very simple. I like its simplicity but I do fear that my “flamboyant” personality will grow tired of this. This really would be my exhausted design choice. I love those beams. Those will never be in this house. Oh, and a bathroom this size will never be in this house either unless I decide to convert a bedroom into a bath. Lame.

The other room is a rustic bathroom. I apologize. I have also forgot where this one came from. This is more our speed. It appears to be a tiny, realistic bathroom. I do like the wainscoting going all the way up the wall. I look as wainscoting as the paneling of today. I do fear that it will be horribly dated. I am considering wainscoting because the plaster in the powder room is well, crumbly and thin. Frink smushes his smushed, flat face against the wall and it dents. We need to come up with something to solve this problem. Anyways, I like this 2nd bathroom because it is so practical. It actually looks like it is lived in and they’ve had to create storage for an older bathroom. David’s solution is to get rid of my skincare rituals. This will never happen. He better be ready to hang up some shelves.

-Victoria

Read Full Post »

I’m not one to decorate with paper lanterns. They just don’t fit with our house and our design. OK, so I mean that I haven’t found a way for them to work with our house or our design. I do find them attractive. They are so fragile, weightless, and light but they take up so much space and really can make a great focal point for a room. For something so “flimsy”, it can really make a statement. They are usually inexpensive and add whimsy to a space. If you add them to a room, it makes that room feel like a party and very festive.

I did find this really cute room in British Vogue. It’s a bit too cottage chic for my style but I do like it. (Don’t get me wrong. I do appreciate cottage style. I’m just not in the place or the home for it). I often find that when I see paper lanterns in decorating, it is often in a room for a teen or child. Paper lanterns can look too young and too dorm-like. This room may be country cottage, but at least it looks grown-up. This isn’t a dollhouse cottage. It’s quirky and fun. The lamp really pops against the paleness of the room. It’s a nice piece of art, a focal point, to have in this family room/library. I love red used as an accent. I’m such a sucker for it. David and I have decided that blue would be our new red, but I don’t think that has lasted.

pic found in British Vogue

I love red and vermillion and carmine. I also love these country cottage curtains against the red floral lantern. If you are going to have a country cottage you might as well mix floral prints.

Anyways, I also like the concept of this room and not just its style. I love that it is a library styled family room/dining room. Children can get homework help there. Children and adults can do art projects. Grown-ups can drink tea and look at design blogs on their laptop. It’s a nice use of that space without looking like a typical family room. It’s cute enough to entertain in. And it looks very “budget” friendly. These are the kind of pieces that one can collect from yard sales, thrift stores, and International markets.

Well, we’re renting that industrial buffer today to finish up the hardwood floors downstairs today. Boy, are my abs going to hurt tomorrow. Buffers belong in a rodeo.

-Victoria

Read Full Post »

Go to Lowe’s or Home Depot and ask someone about where to find floor waxing supplies, or worse yet, for advice, I dare you.  Waxing floors is “old-people” knowledge.  To figure out how to do it, ask somebody old how their mother did her wood floors.  It was lost as a common practice decades ago, supplanted by cheap polyurethanes and the desire for a tough, resilient finish.

Restoration of houses is so often plagued by lack of knowledge of historical methods.  Rather than do the real thing, lot’s of renovators would rather use a contemporary method and try to fake the antique look.  Plaster work is another fine example of this.  You’ll never match the real thing.  Ask a remodeling contractor how to do plaster repairs, and the answer is: “tear out the wall and dry wall it, then spray it with texture.”  Which, by the way, typically looks nasty compared to actual lathe and plaster with texture.  As if the builders had a job-site compressor with a hopper full of goop in 1935.  I still haven’t been able to figure out how they actually did it, but I’m guessing they sponged it and did the entire house by hand.  Labor was cheap in the 1930s, and materials were expensive.

When we bought our house, we pulled up the nasty light blue shag carpet to find mostly perfect old growth white oak floors.  According to contractors, hardware stores, neighbors, and the internet, the only option was to sand it all the way down to get all the wax out, and then apply a polyurethane or aluminum oxide coating.  Then the  bids on that came in at nearly $6,000!

But we didn’t even want “perfect floors,” we wanted “antique” floors.  Floors that showed the age of the house, and that had the same beautiful warm glow that these originals had.  I spent hours trying to figure out how to do this myself.  I could rent a sander and try to get the floors refinished myself- not that much of a stretch for me, because I’ve done a little bit of furniture finishing.  I estimated the cost of that process at over $1000- if I ignored all the time and energy that would be spent on cleaning up the unbelievable mess created by sanding 1500+ sq. ft. of wood down an 1/8 of an inch.  I’m not one of those people who thinks that I’m Donald Trump and that I can’t be hassled with doing work or spending time- but getting that much sawdust out of all these textured walls and trim would be an absolute nightmare.

So I took a risk and I pursued waxing the floors.

It's a finesse game, so I never got it.

It’s kind of inherent in my personality to distrust most of what people tell me not to do- especially when they don’t appear to have a good reason.  I’m happy to say that we almost have our entire house done with wax now, and I anticipate cost will easily be under $200.

Here’s what I learned:

1.  Wax: to wax a wood floor, you need a paste wax.  SC Johnson makes a good one for about $5 a can, and a can will do about 400 sq. ft.

2.  Restoration and Cleanup: I used Howard’s Restore-a-Finish and Howard’s Feed and Wax. They’re the highest cost items I bought, but a little goes a long, long way.  Both of these products were absolutely magic on the “golden oak” color of our floors.  Rub your stains and paint splatters out with steel wool and soapy water.  Let it dry.  If the stain lightened the wood, apply the restore a finish- in small amounts.  If it didn’t, then apply the feed and wax.  Always rub with the grain of the wood, and try to stick to one board at a time.  If you don’t, you’ll run the risk of the steel wool catching on a splinter and fraying.  Not a huge risk to the floor, but when you’ve got a lot of floor to do, don’t waste your time trying to pick #0000 steel wool out of splinters.

3. Applying Product to the floor: Apply Feed and Wax to the entire floor with a wide lambskin “stain applicator” on a long pole.  Use the pole to quickly smooth out any uneven application of wax.  Do this enough, and you might achieve a nice shine- but it’s not really important at this state.  Leave the floor alone as much as you can for a few days.  Then, using a rag, apply the SC Johnson Paste Wax with the grain and let it sit for a while.

4. Buffing:  we paid about $30 for 24 hrs. of renting a commercial buffer and buying the wheel.  This thing is like wrangling a roid raging rodeo bull.  Start the buffer in the middle of the room the first time- because it will pretty much tear your arms off.  Go slow, and cover every area you can with it.  Use the lambskin application on the corners.

In general, you should remember that the house you’re renovation may have really “thirsty” floors because it’s been poorly (or in our case: not) maintained.  So don’t rush into just paste wax and buff.  Clean the floor thoroughly and apply a feed and wax and wait. Give it two weeks if you have to.  You’ll probably find that your feed and wax sinks right in and looks like it was never applied.  Apply it again, and repeat a couple times before you apply wax and buffing.  Our first round with the buffer was disappointing because all the wax soaked in after we buffed it.  It looked awesome for a month.

The end result of all this is a finish that I absolutely love- and one that you can repair, not just replace.  Any time the floor gets damaged, I apply steel wool and feed and wax.  Once or twice a year, we’ll have to reapply wax and rent the buffer again.  That’s a lot of work.  But at 10% the cost of the alternatives, and when it looks this good, it’s hard to want a poly finish now.

Just look at how “worn” these floors feel.  It feels like every single board is a slightly different shade of gold.  I didn’t buy an old house to try and make a new house out of it- and if that’s your goal, you’ll find yourself frustrated at every turn in a home renovation.

This project was just another confirmation of our philosphy for the renovation: work with the house, not against it.

-David

Read Full Post »
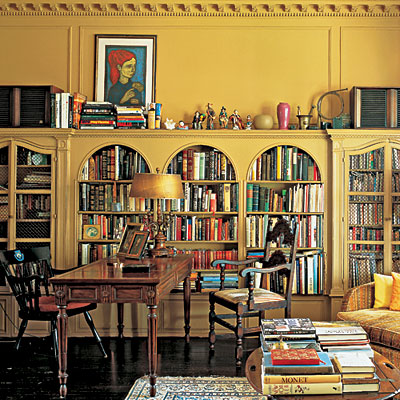
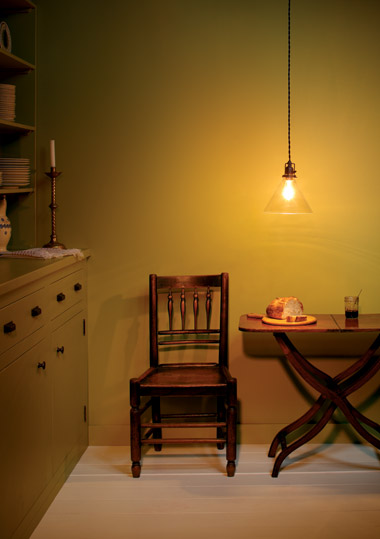
I love mustardy yellow ochre shades but I have never “played” with it when it comes to decorating. It really doesn’t work well with the colors that we have used in the interior. But, man I love it. I like any color that reminds me of decaying leaves on the forest floor.

saccentslibrary

Southern Accents Ochre Library

This first room is a library from Southern Accents (RIP). This is one detailed room. I really do wish that the trim and some of the millwork was painted in a contrasting color such as white or espresso to really make it pop. I have no idea why they are trying to understate its magnificence. We pedestrian people would about do anything for a room with this much architectural strength. But, anyways. This ochre works so well with the rich patina of all of the wood tones. It really creates a luxe color palette. I also love the pops of vermilion and teal. This keeps the ochre from being too “stuffy”. I also love these ornate built-ins and the touch of the chicken wire is nice. It’s a great room. It really has an old world charm that the ochre helps to bring out.

This other room is really trying to sell the McCoy lighting fixture from Rejuvenation. This is a tiny dining space/kitchen that I love. I love the lighting and if I had a space that would work with pendant lighting, I would have to use some of this antique industrial inspired lighting. (I am considering the boudoir but I am fearful that I would bump head). This ochre color room, with the perfect lighting, looks great with wood tones too.

rejuvenationmccoy

kitchen featured in Rejuvenation

The room is a bit plain since it only exists to sell us the lighting fixture. The fixture is the only work of art allowed. But, throw a early modernism painting on that wall and this room is complete. I also love how both of the rooms play with warm tones metals. Ochre is just meant for those.

I know I say that I am not ready for yellow. But, I think I may be if it is ochre. It is growing on me. And like other “cheery” shades, it must be mixed with woods and warm metals to keep it from looking too gingham country cottage or shabby chic.

-Victoria

Read Full Post »

I don’t really do “color”. Just look in my closet. It is a collection of black and gray; however, you will see some orange and coral peeping out of that abyss. I have a thing for orange. I would love to have an orange room but it isn’t really fitting with the scheme of things right now. But, I can admire it and plan for the future, right?

marthafoyer

foyer from Martha Stewart

This first little space if from Martha Stewart’s website. I love the bold harvest orange with the crisp white millwork. This really pops. I love it against the deep wood tones. (That being said, I love anything against deep, rich wood tones). But, yes. This is a great space. I adore the curiosities displayed on the walls and love their bold, graphic, and simple frames. What is that black/espresso stuff lining each edge? I think the website said it was ribbon. That’s a bit odd and time consuming, I imagine. I’m sure it would look silly in real life but it takes a great picture. I would personally just painted it. This is a nice small foyer, about the same size and layout of the one that we have. Currently, it is housing a dark ladder back chair until I find that perfect something. I still do not what that something is.

The other room is a living room from Southern Accents (RIP). This room has that colonial feel but it is really fun and vivid with the walls that harvest orange shade. This is another example of how nice this color goes with white millwork (doesn’t everything). I like to see orange look this formal and not like an Ikea show floor. Orange has the potential to really look elegant without being too immature or “modern” a.k.a Target’s “dorm” collections. It works nicely with deep woods and some rustic pieces. I must mention that this chair in this room is very weak. I am not fond of “skirts” but the chair could of benefited from a print or even another bold color such as ochre or brick. However, that’s my opinion.I can never look at a room and think that is perfect and to my liking. I do the same to my own space. Perhaps that is one of the many reasons why this is taking so long.

saccentorangelr

Southern Accents harvest orange living room

-Victoria

Read Full Post »

Older Posts »